Tuesday, 15 January 2013

Using Excel to Build QTP Tests and Test Sets in Quality Center

This post will show how you can use Excel VBA to automatically create a QTP Test in Quality Center and then automatically assign the test to a test set. I have used this in one of my frameworks to represent Excel keyword driven test cases with QTP driver tests in QC, and automatically build test labs linking to the tests. Essentially it is automating the QC test plan and test lab builds.

Firstly I would like to put a few caveats in place:
  • This is just a proof of concept release. Please feel free to take the spreadsheet and develop it for your needs but I won't be able to support it for you. If you get stuck, start debugging the VBA and looking at the OTA documentation.
  • I have written functions to encapsulate Quality Center OTA calls. For some reason these can be a big buggy, so if the OTA calls fail you usually need to close Excel completely and then reopen it.
  • If you're testing this out remember to delete the tests & test sets created between each run, otherwise the code will throw some warnings.

The spreadsheet is a two step process:
  • It copies a known QTP test to a location in the test plan and then renames it. This creates a unique version of the test.
  • Then it creates the test lab and associates the QTP test to it.

Here's how to do it:
  • First of all download the spreadsheet from this link and open it in Excel (ensure macros are enabled). 
  • In Excel open up the VBA editor (Alt + F11) 
  • Open the module "modBuilder" and find the function called "Builder".
  • You will need to edit the line and change these values with your own QC setup:
If Not ConnectToQC("YOURSERVERNAME", "YOURDOMAIN", "PROJECTNAME", "USERNAME", "PASSWORD") Then
  • Return to the Excel workbook. Each row represents a test that will be created and added to a test set. You need to ensure that:
    • The template path and template name have been defined (columns A and B). These will point the code at an existing QTP test in the test plan.
    • Define the location where the new test will be created (columns C and D).
    • Define the test lab path and test set name where the new test will be created (columns E and F).
Once this is all setup click on the "Build" button and your tests and labs will be built!


Thursday, 26 July 2012

QTP Run As Example

The following code demonstrates how to use a Run As command to open applications within QTP.

An example of calling the function would be:

Call RunProcessAs("dave@domain","password","C:\Program Files (x86)\Internet Explorer\iexplore.exe")

The key thing to note is that the user and domain are passed in as one parameter (you could modify this so that they are not).

Here is the function:

'Function Name:  RunProcessAs
'Function Purpose: Runs a process using the "RunAs" command.
'Input Parameters: strUserAtDomain - the user and domain to use. e.g. Test UserName@DOMAIN
'     strPassword - Password for the username. e.g. Password
'     strApplicationLaunchParams - Launch details of the program as if it were being launched in a cmd window. 
'             e.g. C:\Program Files (x86)\Internet Explorer\iexplore.exe www.google.com
'Creation Date:  July 7th 2012 by David Hartley
'Modification Date: 
Function RunProcessAs(strUserAtDomain,strPassword,strApplicationLaunchParams)
 Dim strThisFunctionName : strThisFunctionName = "[Function RunProcessAs] " 
 Dim strRunAs
 Dim objFSO
 Dim strBatFilePath
 Dim objBatFile
     Dim objDesc,objDescCol
 Dim n
 Dim strBatWindow


 'An example of the desired launch string would be:
 ' runas /user:"test UserName@DOMAIN" "C:\Program Files (x86)\Internet Explorer\iexplore.exe www.google.com"

 'Construct the RunAs launch string:
 strRunAs = "runas /user:" & chr(34) & strUserAtDomain & chr(34) & " " & chr(34) & strApplicationLaunchParams & chr(34)

 'Now create a bat file to launch this from - the bat file will allow us to create our own cmd window for this process.
 Set objFSO = CreateObject("Scripting.FileSystemObject")
 strBatFilePath =  objFSO.GetSpecialFolder(2) & "\QTPRunAs.Bat"

 'delete the file if it exists
 If objFSO.fileexists(strBatFilePath) Then objFSO.DeleteFile(strBatFilePath)

 'now create the bat file
 Set objBatFile = objFSO.OpenTextFile(strBatFilePath, 8, True)
 Call objBatFile.WriteLine ("title QTP RunAs")
 Call objBatFile.WriteLine (strRunAs)
 Call objBatFile.WriteLine ("timeout 10")
 objBatFile.Close  
 
 'before we run the bat file, just check there are no already opened instances
 Set objDesc = Description.Create
 objDesc("micclass").value = "Window"
 objDesc("regexpwndtitle").value = "QTP RunAs"     
 Set objDescCol = Desktop.ChildObjects(objDesc)
 If objDescCol.count >0 then
  For n = 0 to (objDescCol.count -1)
   objDescCol(n).close
  Next
 end if

 'Now run the .bat file
 systemutil.Run strBatFilePath
 wait(1)
 strBatWindow = "regexpwndtitle:=QTP RunAs" 
 Window(strBatWindow).Activate 
 Window(strBatWindow).Type strPassword
 Window(strBatWindow).Type  micReturn 
 wait(2)

End Function

Wednesday, 2 May 2012

Vbscript to Shutdown a PC

Here's a quick script I put together that will shutdown a PC after a defined period of time - it basically acts as a free shutdown timer. You'll need sufficient permissions to do this, check that you can execute the "shutdown" command from a dos prompt and you should be fine.
Just copy and paste this code into a text file and rename the extension to .vbs.

Code:
Call WaitRoutine() 

Sub WaitRoutine()

                Dim intWaitedTime
                Dim intMinsToWait : intMinsToWait = -1
  Dim objshell


   set objShell = CreateObject("WScript.Shell") 
                strAnswer = InputBox("How many minutes do you wish to wait?","Shutdown Computer")
                on error resume next
                intMinsToWait = cint(strAnswer)
                if (intMinsToWait = -1) or (strAnswer = "") then
                                msgbox "Shutdown Cancelled.",vbokonly + vbexclamation,"Shutdown Computer"
                                exit sub
                end if               

                NewDate = DateAdd("N", intMinsToWait, now())
                If msgbox("This will shutdown the computer at " & NewDate & ". Continue?", vbquestion + vbyesno,"Shutdown Computer") = vbno then
   exit sub   
                End If               

                'make script sleep
                WScript.Sleep(intMinsToWait * 60 * 1000) 

  strShutdown = "shutdown -s -t 0 -f -m \\" & "."
  objShell.Run strShutdown
  Wscript.Quit
End sub

Tuesday, 3 April 2012

QTP .net .object properties - getting started

I've been using the .net native properties to provide extra support for the controls in the application I'm working on.

An area I've been struggling with is to identify what type of .net control I'm working with. Qtp may recognise it as a swflist but the .net control type could be completely different to another type of swflist. I've found a simple way to determine the control type:

object.ToString

So if you wrap this around a msgbox box you can find out the .net obejct class you're working with:

msgbox swfwindow("a").swflist("abc").object.ToString

When I executed this against a control I have, it tells me that it's a system.windows.forms.checkedlistbox type. Perfect, I can now go and look up the methods for this in the MSDN Library.

Wednesday, 21 March 2012

QTP Object Synchronisation

Performing synchronisation in scripts is something that should be straight forward - the .exist(0) method makes this extremely simple. However, things start to get messy if we need to program extra error handling around it - something that should be straight forwards ends up being several lines of code. If you repeat this several times over then it's not being very efficient.

A way around this is to call a generic synchronise routine each time you want to wait for an object to exist. By following this practice you can build custom error handling into the synchronise routine without bloating your main automation code. I've built this into my keyword framework so that I always call it before trying to interact with an object, therefore I know that the object must exist before I try to do anything with it. It keeps my code clean and improves the reliability of my scripts.

A basic version of this is below, you can call it by hard coding the maximum wait value or if you want to abstract it further, define the timeout value in an environment variable.

The intMaxWait variable is the time in seconds you are willing to wait. The function returns a true or false value depending on whether or not the object was found.

How to call it:
blnSynced = SynchroniseOnObject(Browser("application a").Page("page b").WebElement("element c"), Environment("CustomTimeout"))

Function Code:
Function SynchroniseOnObject(objRepositoryItem, intMaxWait) 
 Dim blnObjectFound : blnObjectFound = False  
 Dim dtStart, intWaitedTime 
 Dim blnBreak : blnBreak = false  

 'get the current start time 
 dtStart = now()   
 do  
  'check if the object exists  
  If objRepositoryItem.Exist(0) Then   
   blnObjectFound = true   
   blnBreak = true  
  Else   
   'otherwise loop - calculate how long we have waited so far   
   intWaitedTime = datediff("s",dtStart,now())   
   If intWaitedTime  > intMaxWait then 
    blnBreak = true  
   else 
    'put some code in here to trap any errors,popups etc
   End if   
  End if
 loop until blnBreak  
 
 SynchroniseOnObject = blnObjectFound
End Function

Thursday, 15 March 2012

QTP: How to post back to the Quality Center Execution Grid during test execution

One of the issues we face is that when our QTP tests fail is that we need to load up the QTP results to see what's happened. If a group of tests have all failed at the same point then usually it's due to the same reasons (typically environmental or a data error). If we can post some of this information back to the QC Exeuction Grid then it potentially saves us time from opening all of the results.

The code below will show you how to do this from within QTP. There are a few things to bear in mind:
  1. Our framework uses a custom reporting function through which all pass, fails, warnings etc are passed. Therefore it allows us to single out errors and post them back to QC.
  2. The QC field has a limitation of 255 chars, so we use this only to post the last error. Our QC field is called "Error Details".
  3. It's used to give us a quick snapshot as to the cause of the failure so we can determine to rerun or investigate the result further. This isn't intended to replace results analysis - we don't "pass" tests until we've fully investigated the results.

The code:
Sub WriteToQCExecutionGrid(strValue)
 Const QCFieldName = "Error Details" 'change this to match your QC field name
 Dim strThisTestName
 Dim objTSTestFactory
 Dim objField
 Dim objTestList, objTest
 Dim blnTestFound : blnTestFound = false
 Dim strInternalFieldName 
 Dim objQCTestInstance

 'setup default values
 strInternalFieldName = ""

 'See if we're connected to QC 
 If not qcutil.IsConnected Then 
  exit sub
 End if

 'See it we're connected to a test lab test set
 If (qcutil.CurrentTestSet is nothing) Then 
  exit sub
 end if

 'Connect to the ts test factory - this represents the execution grid
 Set objTSTestFactory = qcutil.CurrentTestSet.TSTestFactory
 'Now search through the fields to see if we can find one called Error Details"
 For each objField in objTSTestFactory.Fields
  If (objField.Property.UserLabel = QCFieldName) then 
   strInternalFieldName = objField.Name
   Exit for
  End if
 Next

 'If we didn't find the field name, exit
 If strInternalFieldName = "" Then exit sub

 strThisTestName = qcutil.CurrentTestSetTest.Name

 'Now find this test in the execution grid
 Set objTestList = objTSTestFactory.NewList("")
 For Each objTest In objTestList   
  If (objTest.Name = strThisTestName) Then
   'Test was found, so update flag and exit
   Set objQCTestInstance = objTest
   blnTestFound = true
   Exit for
  End If
 Next 

 If not blnTestFound Then 
  exit sub
 End If

 'objQCTestInstance will now hold the test that we need to update
 objQCTestInstance.Field(gstrInternalFieldName) = strValue
 objQCTestInstance.post
End Sub

Example:

Call WriteToQCExecutionGrid("Failed to Load Webpage")

Tuesday, 14 February 2012

QTP: Getting the properties of childobjects

I've been doing a lot of work with childobjects, and one of the issues I've faced when working with the returned collection is determining what runtime properties each object in the collection has. Once you know what properties the object has, it makes it easier to filter your childobject descriptions or choose the right object in the collection to work with.

Unfortunately QTP has lousy debug capabilities in this area so I started researching ways in which you can display the properties of QTP objects and I came across this useful post.

I tweaked this a little bit to produce a function that prints out all of the object properties to the debug window. When combined with some code to iterate the childobjects you can quickly see what all the properties are. This has been tested with QTP 11.

The code

First of all, here's the function to print out all of the object properties

Sub PrintObjectProperties(objQTPObject)
  'This article helped with this function:
  'http://motevich.blogspot.com/2008/11/qtp-object-indentification-properties.html
 Const HKEY_LOCAL_MACHINE = &H80000002
 Dim objReg, strKeyPath
 Dim arrObjectProperties, i
 

 Set objReg = GetObject("winmgmts:{impersonationLevel=impersonate}!\\.\root\default:StdRegProv")
 strKeyPath = "SOFTWARE\Mercury Interactive\QuickTest Professional\MicTest\Test Objects\" & objQTPObject.GetROProperty("micclass") & "\Properties"
 objReg.EnumValues HKEY_LOCAL_MACHINE, strKeyPath, arrObjectProperties

 'now we've got an array of the properties, output all of the runtime properties
 Print objQTPObject.ToString
 Print "micclass:" & objQTPObject.GetROProperty("micclass")  

 If IsNull(arrObjectProperties) Then
  Print "** Object RO Properties could not be found for this class**"
 Else
  For i = 0 to UBound(arrObjectProperties)
   Print arrObjectProperties(i) & ":" & objQTPObject.GetROProperty(arrObjectProperties(i)) 
  Next
 End If
 
End Sub

Then combine with some code that retrieves a collection of childobjects from a QTP object:

Dim objDesc,objDescCol
Dim objQTPObject
Dim n

Set objQTPObject = Browser("A").Page("B")
Set objDesc = Description.Create
'Add any other description filters here
Set objDescCol = objQTPObject.ChildObjects(objDesc)

If objDescCol.count > 0 Then
 For n = 0 to (objDescCol.count-1)
    Print "Child Object " & n
    Call PrintObjectProperties(objDescCol(n))
    Print ""
  Next
End If

The result is that all of the properties of the children are output to the print window.

Thursday, 9 February 2012

SwfListView: Determining the image in a listview using QTP

Some applications use an image in a listview to display information about the status of the item. Unfortunately, QTP does not provide any methods to access this information using GetROProperty.

By using the .object property we can get access to the exposed .net properties and methods of the listview.

Take the following screenshot:


The application is using a red and green icon to display the status. What we want to do is know which icon is being displayed. The following code will output this information to the debug window:

Set oItems = SwfWindow("Application A").SwfListView("lvwListView").Object.Items

For n = 0 to oItems.count -1
 print "Item index " & n & ", ImageKey=" & oItems.Item(n).ImageKey
 print "Item index " & n & ", ImageIndex=" & oItems.Item(n).ImageIndex
Next
Note that we are using two properties here - imagekey and imageindex. This is because the development team may implement this image in two different ways, so one of these pieces of information will tell you what you need to know.


In my example, ImageIndex is set to 1 when the green icon is shown.

For more information and to see what other properties/methods are available, see the ListView and ListViewItem msdn documentation.

Tuesday, 7 February 2012

Executing Coded UI Tests from Quality Center

A few months ago I was exploring the features and practicalities of using Coded UI for automation. One consideration to take into account was whether or not coded UI tests could be executed from Quality Center. 

First of all, why would you want to do this? Well, the QA process at the client site was all geared around Quality Center - test cases, metrics, defects etc so to go down a pure CodedUI route would mean switching all tooling and processes over to TFS. If you've worked in large organisations you'll appreciate that's a fairly long roadmap! 

An iterim solution to was to bridge this gap by seeing if we could execute CodedUI tests from Quality Center.

In this article I will show you the proof of concept I managed to implement. We never went down the CUI route so I haven't been able to spend any more time refining this, but it will get you off the ground and help you explore the possibilities around this integration. This article assumes you have some experience using Visual Studio and Coded UI.

The goals

In order for this to work, the following criteria needs to be supported by the solution:
  1. CUI Test Cases must be represented in Quality Center.
  2. CUI Test Cases must be launched by the automatic runner featur
  3. The execution status of the test must be captured.
  4. A meaningful execution report / logfile must be attached to the results to support analysis.

The limitations

There were a couple of design factors to take into account:
  1. Our CUI tests were designed on a 1 to 1 basis, i.e 1 CUI test represented 1 test case. Multiple iterations were not factored into the design. If your CUI test does use multiple iterations, then you will need to adjust the results analysis function to determine the overall run status for the test. There may also be some clever ways to change the command line execution to run specific iterations.
  2. A QC remote agent feature is not supported so an instance of Quality Center needs to be run on each machine where you are executing the test. I suggest using the standalone QC client exe (the one that doesn't use IE) so that CUI doesn't get confused with the QC browser.

Implementation

To make this article easier to digest, I've split it up into 4 main stages:
  1. Installing mstest.exe on the client machines.
  2. Compiling the CUI test and placing the dll on the client machine.
  3. Creating a VAPI-XP test in Quality Center
  4. Executing the CUI test and analysing the results

1 - Installing mstest.exe on the client machines

mstest.exe is required to execute the coded ui tests, it's a command line tool which you use to launch the tests. We will invoke mstest.exe from Quality Center and tell it which coded ui test to execute.
You will need to install the agent as an interactive process. This Microsoft Article explains more. If you don't have the CD it looks like you can download the agent here.

2 - Compiling the CUI test and placing the dll on the client machine

The next step is to compile your tests and save them onto the client machine. The basics of how to do this are as follows:
  1. Load your CUI project in Visual Studio.
  2. Right click the project and select “build”.
  3. In the output window, note the directory that the dll is compiled to.
  4. Copy the entire directory to the the host machine where you will be executing the test on(ensure you place it on the C: drive of the host machine, this may have been a system policy in place where I worked but I couldn't launch the tests from any other drive).
Note: If you plan to run a test on a machine where Visual Studio is not installed, you will need to compile it with all of the supporting dll's copied into the local folder, as per the screenshot below:


3 - Create a VAPI-XP test in the Quality Center test plan

You will need to create a test in Quality Center that represents the CUI Test. This is so that you can run it from the test lab. To do this, create a VAPI-XP test and then write some vbscript code that calls the CUI test:

1) Navigate to the QC Test Plan
2) Select "Tests" > "New Test".
    - Type: VAPI-XP Test
    - Name: Give it a relavent name
    - Click OK


3) Choose the Script Language as "VBScript" then click Next,


4) Set the test type to "Console Application Test" then click Next.


5) Click on Finish.
6) Select the test and click on the "Test Script" tab.


7) Replace the vbscript code with this code.
    8) Now you will need to modify the code. The following lines of code will need to be changed in accordance with your setup:
    • Dim strPathMSTestExe :   strPathMSTestExe = "<path to where mstest.exe is installed>"
    • Dim strTestContainerDLL : strTestContainerDLL = "<path to the compiled test dll>"
    • Dim strResultsDirectory : strResultsDirectory = "<path to a directory where the results can be saved>"
    • Dim strTestName : strTestName = "<the name of the coded ui test to run>"  
    Once you've done this, the test is ready to execute from the test lab.


    4 - Executing the CUI Test and Analysing the Results

    To execute the test, simply add it to a Quality Center test set and run it locally (I'm assuming that having come this far you can manage this!).

    Remember the limitation we have is that it can only be run locally (unless you want to program some sort of agent yourself). Therefore I recommend running QC from the standalone client so that the CUI test doesn't get confused with any QC IE sessions that may be open.

    I have programmed a few functions to analyse the results (the .trx file), retrieve any attachments and upload them to the QC. These are attached to each individual run .The functions performing this are called:
    • GetResultsXMLStatus
    • AttachFileToResults
    • GetArrayOfAttachments
    These can be found at the bottom of the vbscript code.

    Note: This method is based on our setup that one test equals one iteration. If you run multiple iterations within a single test then you may need to implement your own way of analysing the results.


    Closing Comments

    This article demonstrates a proof of concept that CUI tests can be executed through Quality Center. Unfortunately I'm no longer engaged on a project using CodedUI so I haven't been able to take this further.

    I welcome any comments, useful suggestions or enhancements you've been able to make. Hopefully this should give you enough help to get off the ground!

    Monday, 30 January 2012

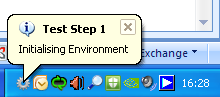
    QTP Notify: a simple utility designed to display notifications in the system tray

    QTP Notify is a simple utility designed to display notifications in the system tray. The purpose of it is to display useful information when a test is executing in way that does not take focus away from the application under test. This can be useful for debugging tests or understanding how far through execution a test is without interfering with the desktop.

    
    Add caption


    The download contains 3 files:
    • The application (QTPNotifier.exe)
    • The QTP function that calls the notification (RaiseNotification), and
    • An Example QTP 11 test.

    Setting Up

    To setup and integrate this with your tests:
    1. Copy the QTPNotifier.exe application to your computer or network drive.
    2. Include the RaiseNotification function in your framework.
    3. Modify the "NPATH" constant in the function so that it points towards the location where you saved QTPNotifier.exe.
    4. In your test scripts call the RaiseNotification function, an example would be: Call RaiseNotification("Title Test","Message Test")
    How it works:

    The application polls the directory where it's saved to and looks for a text file with the format "<computername>notify.txt". When it finds the file, it reads the first line as the title and the second line as the message. It deletes the file and then displays a notification bubble in the notification area. The QTPNotifier.exe application will stay alive for another 60 seconds and repeat if another message is found. If no notification has been raised in the last 60 seconds the application will naturally terminate.

    Things to note:
    1. Theres a small overhead each time you call this whilst the function searches for running processes (might be a second on some machines). This is useful as the QTP Notify application needs messages to have at least 100 milliseconds between each notification.
    2. Sometimes the notification appears behind the current window - this is a known issue with Windows XP, usually a reboot fixes this.
    3. If you are relying on low level mouse moves and clicks then you might click the notification bubble by accident if the mouse is clicked in the bottom right area. You could modify the function to disable itself if a certain environment variable is set.
    4. It's not designed to be robust or perfect...but it does the job for me!

    Tuesday, 15 November 2011

    Treeview for Quality Center Test Plan Using OTA & OTA Code Examples

    I've uploaded a spreasheet containing examples of how to interact with the Quality Center OTA Test Plan and Test Lab Modules. 

    You can download the spreadsheet here.

    The examples attached to the buttons show a tree view selection dialog for the Test Plan. 


    The VBA Code Included also has examples for other OTA interactions as follows: 
    Test Plan (QCTestPlanCommonFunctions)   
    • TestPlanCopyPasteTest - Uses OTA to copy a Test Case in the Test Plan.
    • TestPlanCreateFolderStructure - Uses OTA to create a folder structure in the Test Plan.  
    • TestPlanDoesPathExist - Uses OTA to return True / False if a directory / path exists in the Test Plan  
    • TestPlanDoesTestExist - Uses OTA to return True / False if a test exists in the Test Plan.   
    • TestPlanFindTest - Uses OTA to return a test for a given path and/or it's subfolders   
    • TestPlanGetSubjectNode - Uses OTA to return a Folder as a Subject Node object  
    Test Lab(QCTestLabCommonFunctions)   
    • TestLabAddTestToTestSet - Uses OTA to add a test to a test set in the test lab.
    • TestLabCreateDirectoryStructure - Uses OTA to create a directory structure in the test lab  
    • TestLabCreateTestSet - Uses OTA to create a test set in a directory  
    • TestLabDoesFolderExist - Uses OTA to Returns True / False as to whether a folder exists  
    • TestLabGetFolderByPath - Uses OTA to returns a TestSetFolder object for a given path  
    • TestLabGetTestSet - Uses OTA to return a TestSet for a given path  
        
    A couple of things:    
    • This code can sometimes fail after being run several times. I can't find the reason why, but usually closing Excel and reopening it fixes the issues.    
    • In your code, if you have a loop that creates a folder and then uses "TestLabGetFolderByPath" to find it, you may find it fails. Inserting a call to the function "RebootQCCon" resolves this.    

    Friday, 4 November 2011

    Quality Center OTA: List all Tests in the Test Plan

    The code below is a simple way to show all of the Folders and Tests in the Quality Center test plan. You could use this as a basis to develop a treeview of the testplan in another tool.

    This code is designed to be run from Excel VBA, but you can easily adapt it for VBScript. It assumes that you have already connected to Quality Center which is represented by the "tdc" variable in the code.

    This should help anyone having problems with the error "Field < Subject > requires a value from the corresponding list" - the answer to this problem is to encapsulate the subject with quotes - shown below with chr(34) wrapped around TS_Subject. It took me 2 hours to resolve that issue, no thanks to the OTA documentation!!

    Sub ExploreTestPlan()
       
        Dim TreeMgr As TreeManager
        Dim SubjRoot As SubjectNode
        Dim TestFact As TestFactory
        Dim TestFilter As TDFilter
        Dim TestList As List
        Dim oTest As Test
        Dim SubjectNodeList As List
        Dim oSubjectNode As SubjectNode
       
        '*** make sure you have connected to QC with the tdc object ***


        Set TreeMgr = tdc.TreeManager
        Set SubjRoot = TreeMgr.TreeRoot("Subject")
        Set TestFact = tdc.TestFactory
        Set SubjectNodeList = SubjRoot.FindChildren("", False, "")
       
        For Each oSubjectNode In SubjectNodeList
            'Print out the subject path
            Debug.Print oSubjectNode.Path
           
            'Does this have any tests?
            Set TestFilter = TestFact.Filter
            TestFilter.Filter("TS_SUBJECT") = Chr(34) & oSubjectNode.Path & Chr(34)
            Set TestList = TestFact.NewList(TestFilter.Text)
            For Each oTest In TestList
                Debug.Print "Test Name='" & oTest.Name & "' Test Type=" & oTest.Type
            Next
           
        Next
       
    End Sub

    Sunday, 12 June 2011

    Integrating TestPartner with Quality Center

    It’s possible to integrate TestPartner tests with the Quality Center test lab and execute the tests locally on a machine. In order to do this, the following issues need to be addressed:
    •  A “VAPI-XP-TEST” needs to be setup in Quality Center. This acts as a placeholder for the TestPartner Test.
    •  The VAPI test needs to be executed from the QC test lab and actually launch the test in TestPartner on the local machine.
    • After the test has run we need to be able to analyse the results and determine the overall run status so that we can update the Quality Center test lab with a “Passed” or “Failed” status.
    • After analysing the results, we need to attach them to the Quality Center test lab, so that any testers investigating the reasons for failure can look into potential problems.
    Before you start, download the “Test Partner Results Extractor.xls” file to the machine where you need to execute the tests on. This component is required to perform the results analysis after executing the test, and is explained later on. For the purpose of this example I recommend you create a directory and download the file to "C:\TestPartner\".


    So here's how you do it.....


    1)  Setting up the VAPI-XP-TEST
     
    - Go to the Quality Center Test Plan

    - Select Tests > New Test and choose these settings (note: you must give the VAPI test the same name as your TestPartner TestScript / Visual Test).


    - Press Ok. 

    - If there are any mandatory QC fields, fill them in.

    - In the VAPI wizard, choose these settings:


    - Click on Finish.

    - Now select the test from the test lab, and click on the “Test Script” tab.

    - Paste the following code into the Test Script:


    ' ====================================================
    ' VAPITest01 [VBScript]
    ' Created by David Hartley
    ' 01/06/2011 16:34:25
    ' ====================================================

    ' ----------------------------------------------------
    ' Main Test Function
    ' Debug - Boolean. Equals to false if running in [Test Mode] : reporting to Quality Center
    ' CurrentTestSet - [OTA COM Library].TestSet.
    ' CurrentTSTest - [OTA COM Library].TSTest.
    ' CurrentRun - [OTA COM Library].Run.
    ' ----------------------------------------------------
    Sub Test_Main(Debug, CurrentTestSet, CurrentTSTest, CurrentRun)
     
      ' clear output window
      TDOutput.Clear

      '***************** VARIABLES TO BE MODIFIED **************************
      Dim strTPDatabase : strTPDatabase = "Test Partner"
      Dim strTPUsername : strTPUsername = "David Hartley"
      Dim strTPPassword : strTPPassword = "pass"
      Dim strTPProject : strTPProject = "Common"
      'Test Name - this code can launch a Visual Test or a Test Script. Only fill in the test name
      'for the type of test you are launching, e.g if it's a visual test then leave strTPTestScriptName blank
      Dim strTPTestScriptName : strTPTestScriptName = ""
      Dim strTPVisualTestName : strTPVisualTestName = CurrentTSTest.TestName
      Dim strTestPartnerResultsExtractorName : strTestPartnerResultsExtractorName = "Test Partner Results Extractor.xls"
      Dim strResultsDirectory :  strResultsDirectory = "C:\TestPartner\"
      '***********************************************************************************************

      Dim WshShell, objExecObject, strOutput
      Dim strCommand, strTestTypeCommand, strRes
      Dim strTestName
      'Now setup some variables to handle to test results
      Dim strMacroName : strMacroName = "ExtractResultsFromTP"
      Dim strExpectedExcelResultsPath
      Dim strTimeStamp
      Dim strTemp
      Dim objExcel, objExcelWorkbook

      'setup the timestamp in YYYYMMDD_HHMM format
      'get the year
      strTimeStamp = year(now())
      'get the month
      strTemp = month(now())
      if len(strTemp) = 1 then strTemp = "0" & strTemp
      strTimeStamp = strTimeStamp & strTemp
      'get the day
      strTemp = day(now())
      if len(strTemp) = 1 then strTemp = "0" & strTemp
      strTimeStamp = strTimeStamp & strTemp & "_"
      'get the hour
      strTemp = hour(now())
      if len(strTemp) = 1 then strTemp = "0" & strTemp
      strTimeStamp = strTimeStamp & strTemp
      'get the minute
      strTemp = minute(now())
      if len(strTemp) = 1 then strTemp = "0" & strTemp
      strTimeStamp = strTimeStamp & strTemp
      'get the seconds
      strTemp = second(now())
      if len(strTemp) = 1 then strTemp = "0" & strTemp
      strTimeStamp = strTimeStamp & strTemp

      'setup testname variable
      if strTPTestScriptName <> "" then
         strTestName = strTPTestScriptName
      else
         strTestName = strTPVisualTestName
      end if

      'Now we can setup the expected excel results path
      strExpectedExcelResultsPath = strResultsDirectory & strTestName & " Results " & strTimeStamp & ".xls"

      'Now start setting up variables used to send the command
      if strTPTestScriptName <> "" then
          strTestTypeCommand = """ -s """ & strTPTestScriptName &  """"
      else
          strTestTypeCommand = """ -t """ & strTPVisualTestName &  """"
      end if

      'create a windows shell object
      Set WshShell = CreateObject("WScript.Shell")
      'construct the command we want to send to it
      strCommand = "TP -d """ & strTPDatabase &  """ -u """ & strTPUsername &  """ -p """ & strTPPassword &  """ -r """ & strTPProject &  strTestTypeCommand
      'this is useful for debug purposes
      TDOutput.Print "Launching TP with this command:"
      TDOutput.Print strCommand
      'Now run the command which will launch TestPartner - if nothing happens, put the command into a
      'command prompt window (start > run > "cmd") to see if there are any errors from it

      Set objExecObject = WshShell.Exec(strCommand)
      strOutput = objExecObject.StdOut.readall()
      if strOutput <> "" then
         TDOutput.Print strOutput
         'if this was a visual test, then this outputs a playback error but we can still go on to retrieve the results
         if instr(strOutput, "Playback error") <= 0 then
              If Not Debug Then
                 TDOutput.Print "Test Failed to launch"
                 CurrentRun.Status = "Failed"
                 CurrentTSTest.Status = "Failed"
              end if
              exit sub
         end if
      end if

      'if we reach here then the test ran correctly, we can now go and retrieve the results using the excel workbook
      Set objExcel = CreateObject("Excel.Application")
      'objExcel.visible = true 'show excel *** Uncomment this if you want to see what is happening ***
      'open the extractor workbook - this will do the donkey work of retrieving the results
      TDOutput.Print "Opening " & strResultsDirectory & strTestPartnerResultsExtractorName
      set objExcelWorkbook = objExcel.Workbooks.Open(strResultsDirectory & strTestPartnerResultsExtractorName,false,true)'opens it readonly
      'now setup the variables on the config sheet
      objExcelWorkbook.sheets("config").select
      'setup the variables
      objExcelWorkbook.sheets("config").cells(1,2) = strTPDatabase
      objExcelWorkbook.sheets("config").cells(2,2) = strTPUsername
      objExcelWorkbook.sheets("config").cells(3,2) = strTPPassword
      objExcelWorkbook.sheets("config").cells(4,2) = strTPProject
      objExcelWorkbook.sheets("config").cells(5,2) = strTestName
      objExcelWorkbook.sheets("config").cells(6,2) = strTimeStamp
      objExcelWorkbook.sheets("config").cells(7,2) = strResultsDirectory

      'now run the macro to generate the results (this causes VAPI to crash so wrap error handling around it)
      TDOutput.Print "Retrieving results"
      on error resume next
      objExcel.run strMacroName
      on error goto 0

      'if we're not in debug mode then open the results and determine the pass/fail status
      If Not Debug Then
         TDOutput.Print "Opening results worksheet: " & strExpectedExcelResultsPath
         'now open the results worksheet to determine the pass/fail status
         set objExcelWorkbook = objExcel.Workbooks.Open(strExpectedExcelResultsPath,false,true)'opens it readonly
         'what is the overall status of the results (this is calculated by the Excel Workbook)?
         if objExcelWorkbook.sheets("Results").cells(1,5) = "Pass" then
            TDOutput.Print "Test passed"
            CurrentRun.Status = "Passed"
            CurrentTSTest.Status = "Passed"
         else
            TDOutput.Print "Test Failed"
            CurrentRun.Status = "Failed"
            CurrentTSTest.Status = "Failed"
         end if
         objExcelWorkbook.saved = true
         objExcelWorkbook.close

        'now upload the workbook results to the curentRun - this means
        'that when you double click the results in QC you will see this as an
        'attachment
        TDOutput.Print "Uploading results from: " & strExpectedExcelResultsPath
        set attachF = CurrentRun.Attachments
        Set theAttachment = attachF.AddItem(null)
        theAttachment.FileName = strExpectedExcelResultsPath
        theAttachment.Type = 1
        theAttachment.Post

      end if

      objExcel.quit
      set objExcelWorkbook = nothing
      set objExcel = nothing
      TDOutput.Print "Finished"
    End Sub
    ' ====================================================


    - Now you need to configure the variables specific to the test. In the header, change these variables:

       strTPDatabase – The name of the database to connect TP to.

       strTPUsername – A username that can execute the test.

       strTPPassword – password for that username.

       strTPProject – The name of the project where the test is saved in.

       strTPTestScriptName – If the test is a TestScript, set this value to “CurrentTSTest.TestName”, otherwise set the value to blank “”.

       strTPVisualTestName– If the test is a Visual Test, set this value to “CurrentTSTest.TestName”, otherwise set the value to blank “”.

       strTestPartnerResultsExtractorName - The name of the excel tool that analyses the results, the default value is "Test Partner Results Extractor.xls".

       strResultsDirectory – A location on the machine where the results will be saved to. The excel tool (strTestPartnerResultsExtractorName) must also be placed in this directory. You must include a “\” character at the end of the path name.


    2)  Executing from Quality Center

    Now the VAPI test has been setup, you can execute the test from Quality Center. Create a test lab and select the VAPI test. To run it, use the run button – you can only run it on the local machine (so check the “Run All Tests Locally” box).


    Whilst it’s running, the Output dialog should display some useful messages. The script works by sending a shell command to invoke TestPartner: “TP –d [database] –u [username] –p [password] –r [project] –t (or –s) [testname]”


    3)  Analysing Results and Attaching them to Quality Center

    Once the test has been run, the VAPI test then invokes Excel and loads the “Test Partner Results Extractor.xls” spreadsheet. This spreadsheet contains a macro which will go and retrieve the test results, export them to an XML file and then import the XML into an Excel workbook, which is saved to the local drive. This happens silently in the background.

    Once the results have been opened in Excel, the Excel code parses the results columns and determines if the run has passed or failed, which the VAPI code then uses to set the pass or failed status in Quality Center.

    The VAPI code then takes the saved results workbook and attaches it to the Quality Center Test Set results so that you can see the run results and reasons for the pass / fail status. In the screenshot below you can see a green paperclip in the attachments – this is where you can find the results.


     Clicking the paperclip takes you to the excel file containing the results.


    So that explains how to launch Test Partner tests from Quality Center, obtain a passed/failed status and have the results uploaded to Quality Center. There are a few things to consider with this approach:
    • The tests can only be executed locally on the machine.
    • The results are in Excel format – this means that screenshots are not included so you may still need to go into TestPartner to investigate the results.
    • Sometimes QC doesn’t save the changes you’ve made to your VAPI script – to check if it has, load another VAPI script and then load your script to see if the changes have been applied.
    • If TestPartner fails to launch the test (check your parameters have been setup, especially the test type), then there will not be any attachments in Quality Center – simply a Failed status.

    A big thanks to this article that helped me develop the Excel tool featured in this example.